Wednesday, March 4, 2015
Friday, October 3, 2014
7:14 AM
No comments
PPTP server with profiles
Assalam-O-Alaikum.
In this article i will be setting up a Point-to-Point Tunneling Protocol (PPTP) Server with different profiles.
First we will configure interface that is connected to WAN.
/ ip address add address=10.0.0.2/24 network=10.0.0.0 broadcast=10.0.0.255
  interface=ether1
Now we will configure second interface for our Local Network.
/ ip address add address=192.168.112.1/24 network=192.168.112.0 broadcast=192.168.112.255
  interface=ether2
Now we will configure PPTP through Winbox, download Winbox from http://demo.mt.lv/winbox/winbox.exe
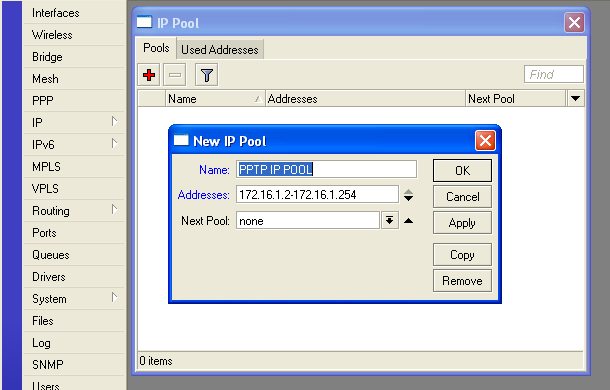
Now goto IP > Pool. Press the PLUS sign in RED, then create a IP Address Pool that will be used by the PPTP to give out IP and Press OK. It should look something like this.
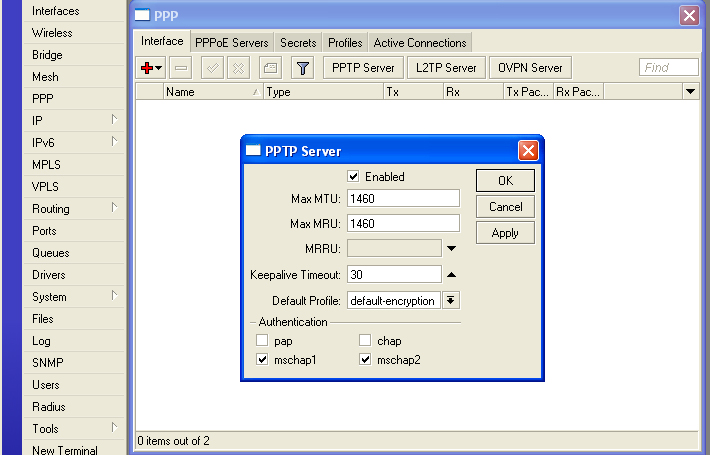
Now we will create a PPTP Server. Goto PPP then press PPTP Server, a new small window will popup, and select Enabled and just press OK.
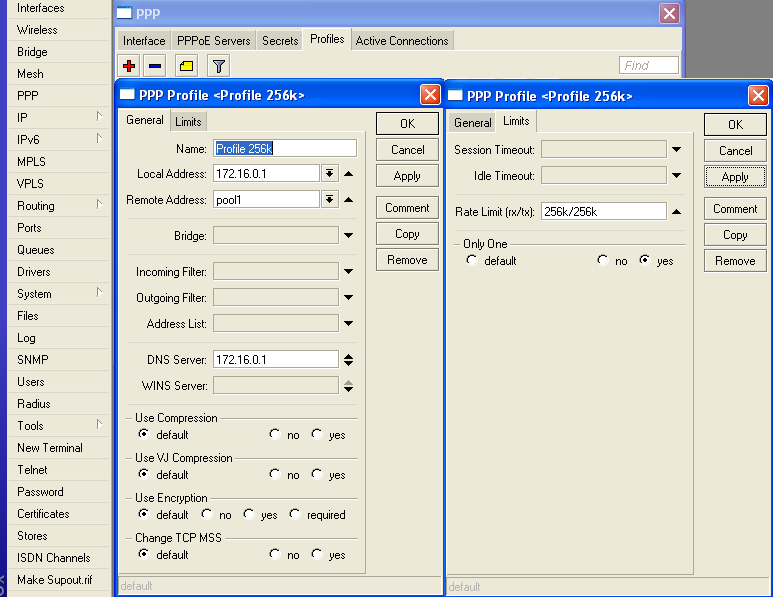
Now we will create a profile that will be used by different users. Goto the main PPP window, goto Profiles tab, here you will see two profiles by default, dont do any thing to these default profiles, create a new profile by pressing the PLUS sign. Name the profile what ever you like (here i have named it name=profile 256k). Local Address is the address of the server (here it is 172.16.0.1) local-address=172.16.0.1. In Remote Address box press the down arrow button you will see the name of the pool that we created in the first step, select it. If you dont see the name of the pool dont worry, name type the name of the pool in the Remote Address Location. In the DNS Server, enter the IP of your SERVER (here i am using mikrotik as my DNS Server) DNS-Server=172.16.0.1. Then goto Limits tab in the same window, now here we have to setup the bandwidth rate at which the users using this profile will be restricted at. Here set the Rate Limit (tx/rx) to what ever you like (i am setting it to 256k up/down). Then press APPLY and OK.
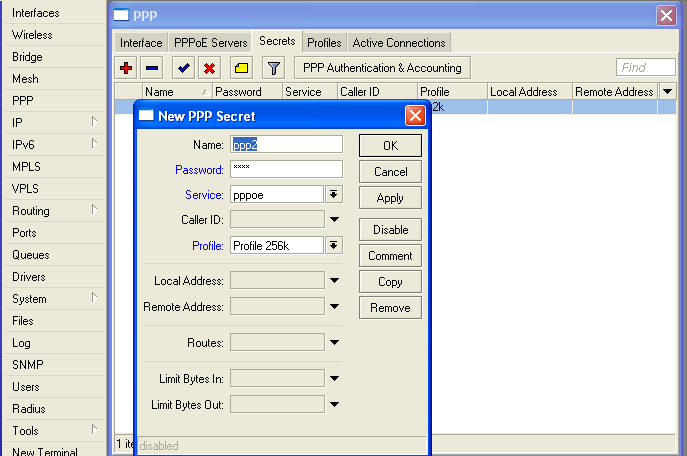
Now we will create users.
Our PPTP Server Setup is complete.
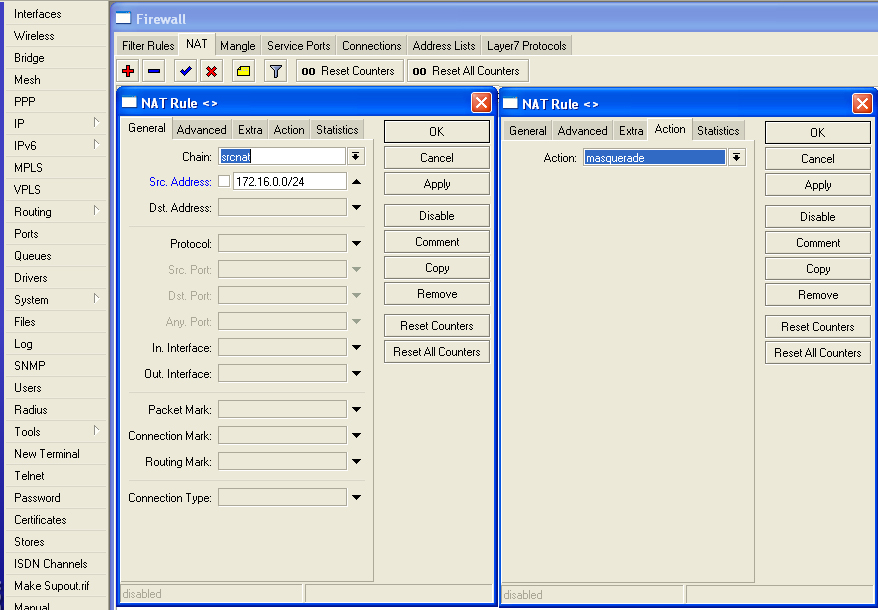
Goto IP > Firewall. In the NAT tab add a new FIREWALL rule, press the PLUS sign. chain=srcnat , src.address=172.16.0.0/24 , then goto Action's tab in the same window, select action=masquerade. Then press APPLY and OK.
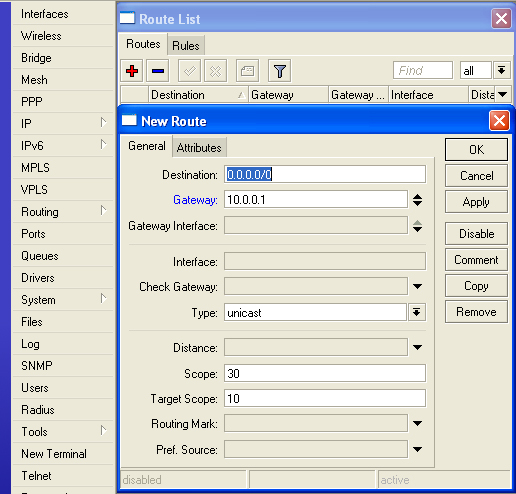
Now we will setup Default ROUTE. Goto IP > Routes , in here add a new Static ROUTE by pressing PLUS sign. Destination=0.0.0.0/0 , set the gateway to the gateway of the interface connected to INTERNET or the main IP of your ADSL Router (here its 10.0.0.1) gateway=10.0.0.1. Then Press APPLY and OK.
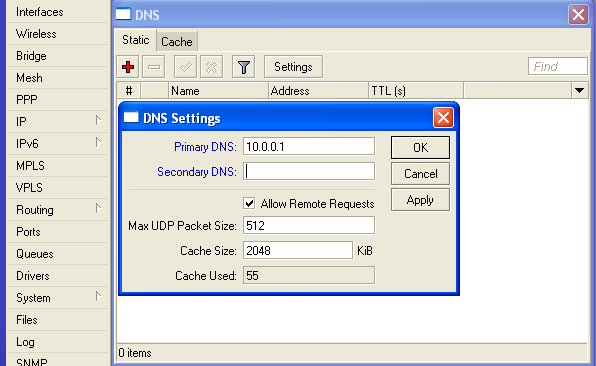
Now the last and final step, setup DNS Server on Mikrotik Router. Goto IP > DNS, press the settings butting. Enter the primary and secondary DNS Server's IP provided by your ISP (here i have a DNS Server on my network i am using that) primary DNS=10.0.0.1 , also select "Allow Remote Request" this will make your Mikrotik Router act as a DNS Server. Notice that i have setup the Cache size=2048 , if you want you can change that, its not that big deal. Now press APPLY and OK.
Now our PPTP Server Setup with Profiles is complete.
PPPoE Server Setup with Profiles
7:12 AM
No comments
Hi everyone. This is my second time i am writing any thing on INTERNET.
In this article i will be setting up a PPPoE (point-to-point protocol over ethernet) Server with different profiles.
First we will configure interface that is connected to WAN.
/ ip address add address=172.16.10.50/16 network=172.16.0.0 broadcast=172.16.255.255
  interface=ether1
Now one interface is configured and connected to WAN (with ip 172.16.10.50/16). Now we will configure second interface for our Local Network.
/ ip address add address=10.10.10.1/24 network=10.10.10.0 broadcast=10.10.10.255
  interface=ether2
Now we will configure PPPoE using WinBOX, download Winbox from http://www.mikrotik.com and login to you MT Router.
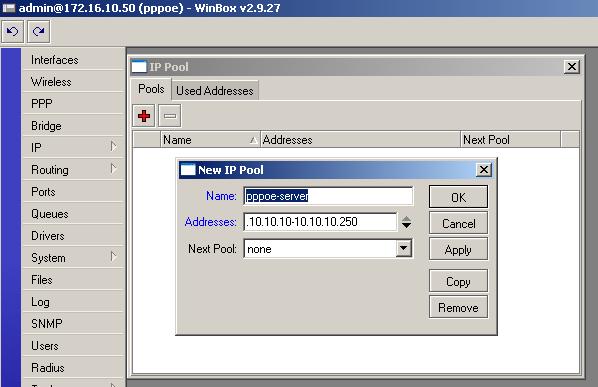
Now goto IP > Pool. Press the PLUS sign in RED, then create a IP Address Pool that will be used by the PPPoE to give out IP (i am using 10.10.10.10-10.10.10.250) Press APPLY and OK. It should look something like this.
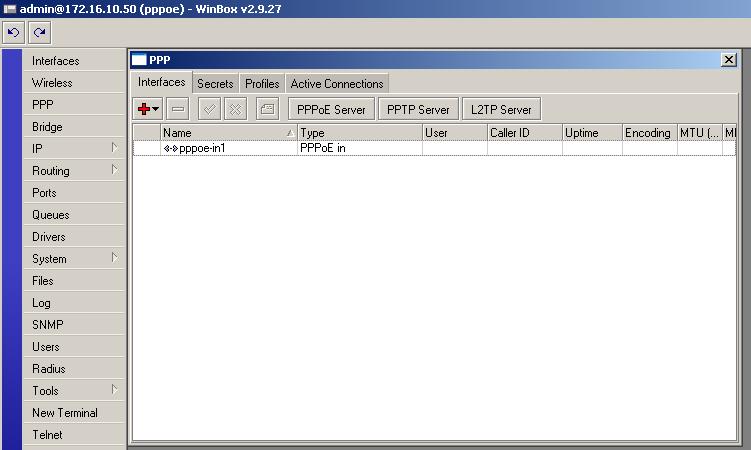
Now we will create a PPPoE Server. Goto PPP then press PLUS sign and select PPPoE Server, a new small window will popup, just press APPLY and OK. You will see a window similar to this one after you press APPLY and OK.
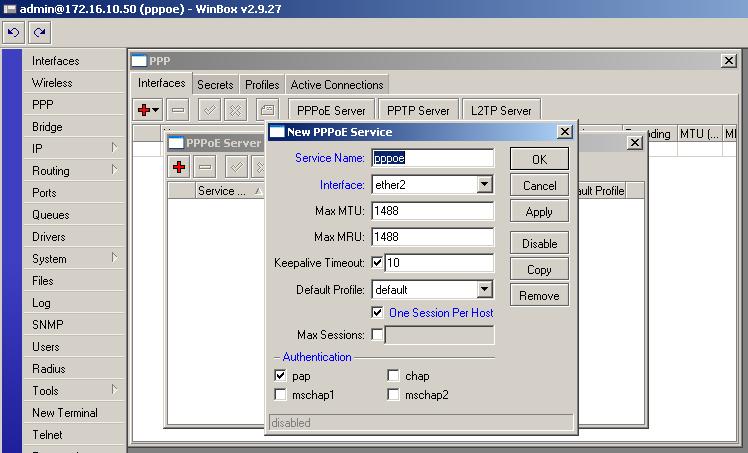
Now we will setup the main PPPoE Server. Press the button which says "PPPoE Server" in the same window. A new window will popup, press the PLUS sign to add a PPPoE Server. Now set the Service Name=pppoe-server (or whatever you like), then select the interface connected to local network (here i have selected ether2). Dont change the values of max MTU and max MRU. Uncheck the button Keepalive Timeout, select the option "Once Session per host". At the bottom of the window you can see 4 authenticaion methods, here only select PAP, and unselect all others. It should look something like this. Now press APPLY and OK.
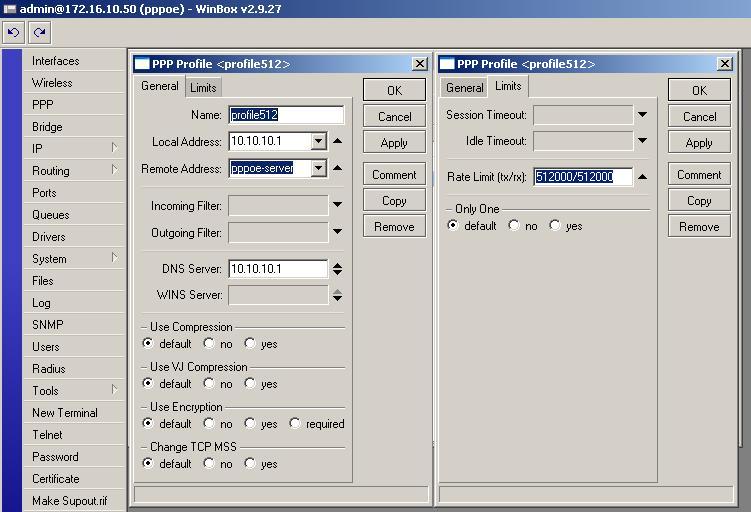
Now we will create a profile that will be used by different users. Goto the main PPP window, goto Profiles tab, here you will see two profiles by default, dont do any thing to these default profiles, create a new profile by pressing the PLUS sign. Name the profile what ever you like (here i have named it name=profile512). Local Address is the address of the server (here it is 10.10.10.1) local-address=10.10.10.1. In Remote Address box press the down arrow button you will see the name of the pool that we created in the first step, select it. If you dont see the name of the pool dont worry, name type the name of the pool in the Remote Address Location. In the DNS Server, enter the IP of your SERVER (here i am using mikrotik as my DNS Server) DNS-Server=10.10.10.1. Then goto Limits tab in the same window, now here we have to setup the bandwidth rate at which the users using this profile will be restricted at. Here set the Rate Limit (tx/rx) to what ever you like (i am setting it to 512k up/down). Then press APPLY and OK. Your settings should be a bit similar to settings shown below.
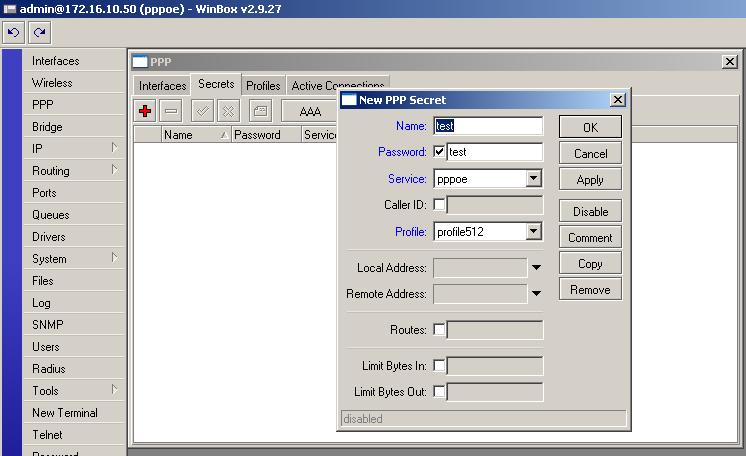
Now we will create users. In the main PPP window goto Secrets tab, then press the PLUS sign to add a new user. Name is the UID ( here i am setting it to test), set the password ( i am setting here to test). Now in the service box, select "pppoe", in the profile select the profile that we created in the previous step profile="profile512". Dont change any thing else. Just press APPLY and OK. Setting should be similar to this.
Our PPPoE Server Setup is complete, however Internet right now will not be working at any cleint. Now we will setup NAT and ROUTE and DNS so that internet will also work on the clients.
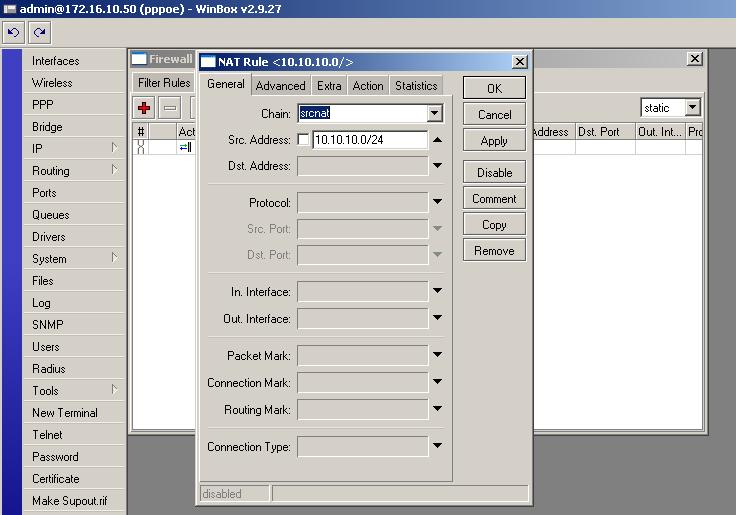
Goto IP > Firewall. In the NAT tab add a new FIREWALL rule, press the PLUS sign. chain=srcnat , src.address=10.10.10.0/24 , then goto Action's tab in the same window, select action=masquerade. Then press APPLY and OK.
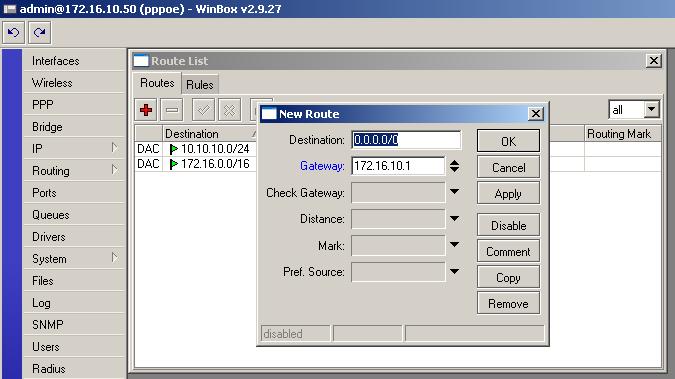
Now we will setup Default ROUTE. Goto IP > Routes , in here add a new Static ROUTE by pressing PLUS sign. Destination=0.0.0.0/0 , set the gateway to the gateway of the interface connected to INTERNET or the main IP of your ADSL Router (here its 172.16.10.1) gateway=172.16.10.1. Then Press APPLY and OK.
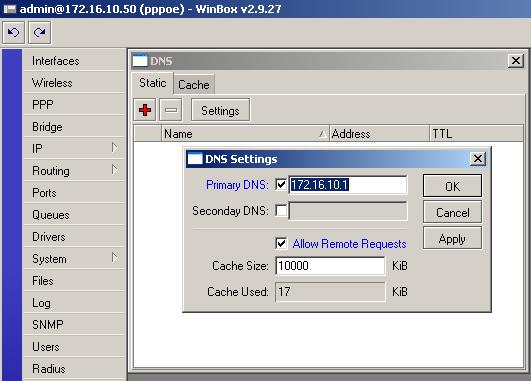
Now the last and final step, setup DNS Server on Mikrotik Router. Goto IP > DNS, press the settings butting. Enter the primary and secondary DNS Server's IP provided by your ISP (here i have a DNS Server on my network i am using that) primary DNS=172.16.10.1 , also select "Allow Remote Request" this will make your Mikrotik Router act as a DNS Server. Notice that i have setup the Cache size=10000 , if you want you can change that, its not that big deal. Now press APPLY and OK.
Now our PPPoE Server Setup with Profiles is complete. Every thing should be working fine. For further help feel free to post on http://forum.mikrotik.com .
Monday, September 15, 2014
Membatasi Koneksi Internet DI jam Tertentu (Scedhule Time Mikrotik)
7:29 PM
No comments
Membatasi koneksi internet di kantor terutama pada jam kerja kantor dapat dilakukan dengan menggunakan Mikrotik. Ada beberapa cara yang dapat digunakan untuk membatasi koneksi internet di Kantor dengan Mikrotik. Disini saya akan coba share Cara Membatasi Internet Jam Kantor dengan Mikrotik yang pernah saya pasang di kantor. Topologi nya seperti ini :
Sistem yang saya buat yaitu dengan membatasi akses ke situs-situs sosial media, porno, video streaming, dll pada saat jam kerja (08.00 - 12.00 & 13.30 - 16.00). Untuk detail nya sebagai berikut :
Membatasi akses :
Jam kerja pagi (08.00 – 12.00)
Membuka akses :
Jam istirahat (12.00 – 13.30)
Membatasi akses :
Jam kerja siang (13.30 – 16.00)
Membuka akses :
Jam luar kerja (16.00 – 08.00)
Pembatasan ini dimaksudkan agar karyawan dapat memanfaatkan waktu nya pada saat jam kerja untuk mengerjakan pekerjaan nya bukan untuk hal yang lain.
Untuk membangun sistem ini, saya menggunakan beberapa tools di Mikroik dan juga bantuan dari DNS external yaitu OpenDNS dan Nawala. Disini saya menggunakan perangkat Mikrotik RB 951Ui-2Hnd yang memiliki port USB sehingga bisa menggunakan modem USB sebagai jalur internet cadangan (untuk failover).
Secara umum konfigurasi yang dilakukan adalah sebagai berikut :
1. Mengatur konfigurasi IP Address untuk jaringan Wi-Fi dan LAN pada mikrotik.
2. Menambahkan konfigurasi NTP (Network Time Protocol) Server untuk sinkronisasi waktu supaya mikrotik dapat berkerja tepat waktu. Ini sangat penting supaya script dapat dieksekusi tepat waktu.
3. Konfigurasi jaringan internet di Mikrotik. Pastikan koneksi internet sudah jalan di Mikrotik. Untuk memastikannya silakan ping ke Google.com
4. Setting interface wireless mikrotik untuk share koneksi internet melalui Wi-Fi.
5. Menambahkan konfigurasi DNS Server dari OpenDNS dan Nawala sebagai filter dan memblokir konten berbahaya.
6. OpenDNS dapat digunakan untuk memfilter situs berbahaya dan memblokir akses ke situs tertentu sepeti social media, video streaming, dan lain - lain. Sementara untuk DNS Nawala hanya memblokir akses ke situs berbahaya.
7. OpenDNS digunakan saat jam kerja. DNS Nawala digunakan diluar jam kerja. Pengaturan nya menggunakan Script & Scheduller. Seting inilah yang akan dibahas pada artikel ini.
8. Mengaktifkan fitur Web Proxy untuk mempercepat koneksi internet (cache) dan memonitor konten yang diakses
9. Menambahkan konfigurasi firewall mikrotik untuk keamanan. Ada beberapa konfigurasi firewall yang saya gunakan :
10. Menambahkan konfigurasi fail over, untuk menambah jalur akses internet cadangan (backup) menggunakan modem USB dan mengaktifkannya saat koneksi jalur utama mati. Silakan lihat tutorialnya disini :
Oke, kembali ke point nomor 7 di atas, disini saya akan bahas Script & Scheduller nya. Silakan simak step-by-step nya berikut ini :
11. Yang pertama, kita akan membuat Script dulu. Pada Winbox, masuk ke System --> Scripts. Ada beberapa Script yang akan kita buat seperti gambar berikut :
12. Untuk Script back2main dan failover digunakan untuk konfigurasi failover menggunakan jalur cadangan modem USB. Silakan lihat point nomor 10 di atas.
13. Script pertama yang kita buat yaitu script jam kerja. Script ini akan memberikan perintah ke Mikrotik untuk mengganti setingan DNS ke IP DNS nya OpenDNS, kemudian melakukan flush cache DNS. Script nya sebagai beriku (masukkan ke kolom Source)
/ip dns set servers=208.67.220.220,208.67.222.222
/ip dns cache flush
14. Script selanjutnya digunakan untuk mengganti IP DNS ke Nawala.
/ip dns set servers=180.131.144.144,180.131.145.145
/ip dns cache flush
15. Hari libur yaitu Sabtu dan Minggu koneksi internet tidak dibatasi, tetapi masih menggunakan DNS Nawala. Caranya dengan mematikan penjadwalan (Scheduler) yang nanti akan kita buat.
/system scheduler disable 0
/system scheduler disable 1
16. Ketika masuk lagi ke hari kerja yakni hari senin, maka aturan nya kembali seperti semula dengan pembatasan internet pada jam kerja. Caranya dengan mengaktifkan kembali scheduler nya.
/system scheduler enable 0
/system scheduler enable 1
17. Script yang sudah kita buat sebelumnya akan dijalankan secara otomatis berdasarkan waktu (jam). Pastikan anda membuat scheduler nya urutan nya sama seperti gambar berikut ini; supaya script pada point 15 dan 16 bisa berjalan.
18. Buat scheduler untuk mengeksekusi script jam kerja (pagi).
Name : Filter Jam Kerja Pagi
Start Date : Pilih tanggal kapan script akan mulai dieksekusi secara otomatis
Start Time : Jam berapa script akan dieksekusi
Interval : 1 hari
On Event : nama script yang dieksekusi (jam kerja)
19. Buat scheduler lagi untuk jam kerja sore yakni pukul 13.30 (sesuaikan jam nya dengan jam kantor anda). Lihat gambar berikut :
20. Ketika masuk jam istirahat, pegawai dapat mengakses social media, video streaming, dll kecuali web dan konten porno. Caranya dengan mengganti ke DNS Nawala. Buat scheduler pada jam 12.00 dengan script luar jam kerja (LJK).
21. Ketika masuk jam pulang kerja, maka koneksi akan sama seperti pada jam istirahat. Disini diasumsikan jam pulang kantor pukul 16.00.
22. Pada hari libur (Sabtu & Minggu) script libur akan dieksekusi secara otomatis pada Jum'at malam pukul 23.59 dengan interval waktu 7 hari. Jadi script ini akan dieksekusi seminggu sekali yakni hari Jum'at malam.
Jadi, Pastikan Start Date nya adalah hari jum'at
23. Pada hari senin koneksi akan kembali dibatasi secara otomatis dengan script senin yang akan dieksekusi pada senin dini hari pukul 00.00. lebih 50 detik dengan interval 7 hari.
Pastikan start date nya hari senin.
Sampai disini konfigurasi script dan scheduler sudah selesai. Jika setingan nya benar seperti di atas maka script nya akan berjalan dengan baik secara otomatis.
Subscribe to:
Posts (Atom)


